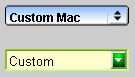
Below is an example of the drop down menu. Click the menu to see it in action.
OVERVIEW
The Common Libraries in Flash 5 has a feature that makes creating a drop-down (pull-down) menu very easy. Using this library is a good way to learn how to create this type of user interface and to learn about the concept of Smart Clips.
THE FRONT END
1. Go to Window » Common Libraries » Smart Clips.
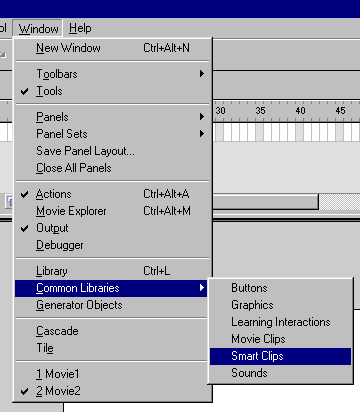
2. Select the movie clip named Menu.

3. Drag an instance of that Menu movie clip to the scene.
4. Right click on the instance and select Panel » Clip Parameters.
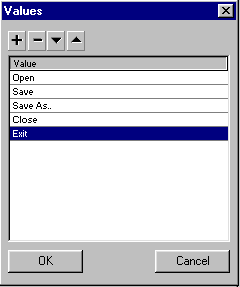
5. You should see the following (if not, deselect everything and repeat step 4 onward):
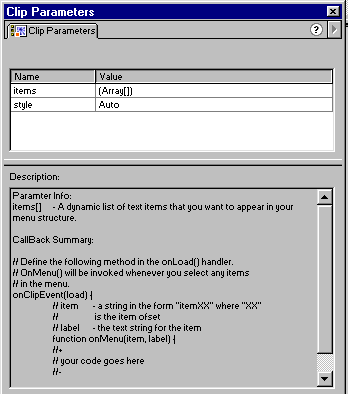
This dialog box shows the parameters for the Smart Clip and a description of how the clip works.
6. You can change the parameters by double clicking the text in the Valuecolumn. The items[ ] array stores the text that appears on the menu. For this example, let’s change the items that appears on the menu by double-clicking on the “Array()” grid.
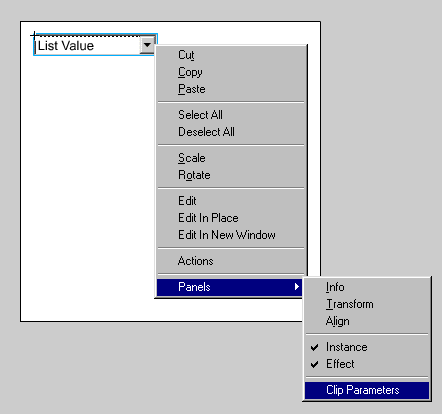
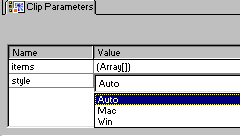
7. At this point, another dialog box should appear (shown below). Here, you can change the text by clicking on it. Also, you can add/delete items by clicking the plus/minus sign.
7. The style parameter sets the appearance of the menu. The options are: Windows style, Macintosh style, or Auto Detect. Double-click the grid just for fun, then select “Mac.”
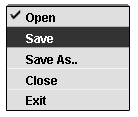
8. Test movie. It should look like below:
HANDLING THE BACK END
On the back end, you can do the following:
- find out which item is currently selected
- change the menu items (text) while the program is running
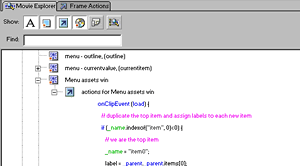
The nice thing about the SmartClip library is that Macromedia has provided a good description of how to use it in the Clip Parameter Description field (shown below).
1. Copy the CallBack Summary portion of the Clip Parameters (second paragraph onward).
2. Insert the following action for the movie clip instance (this code is an exact copy of the Clip Parameters CallBack Summary section above).

This code does the following:
- onClipEvent(load) will be called when the movie clip is loaded (most likely in the beginning). You can assign the values for the items[ ]array here too, if you like. For example, the following changes the 3rd menu item:
onClipEvent (load) { // change the text on item 3 items[2]="Changed Item"; function onMenu (item, label) { // + // your code goes here // - } } - Whenever the user selects a menu item, the function onMenu will be called. Within onMenu:
- You can decide what to do when certain menu item is selected
- The label parameter will contain the currently selected item. This will be one of the items[ ] array value (string);
- The item parameter will contain a number, which is the offset of the selected item (offset 0 means the first item is selected). (The variable naming here is unfortunately rather confusing. Remember that this variable is not the same as the items[ ] array that holds the text for the menu.)
As an example, the code below sets the value of _root.label and_root.item variable, and adds a handler for the menu item “Close.”
onClipEvent (load)
{
  // change the text on item 3
  items[2]="Changed Item";
  function onMenu (item, label)
  {
    // +
    // your code goes here
    _root.label=label;
    _root.item=item;

    // if "Close" is selected, then
    // goto frame 2 on the _root timeline
    // note that this is case sensitive
    if (label eq "Close")
    {
       _root.gotoAndStop(2);
    }
    // -
  }
}
The result of this example is shown on the Flash movie on the beginning of this page. If you select “Close,” the movie will go to frame 2 (in the example, page 2 contains a GO BACK button).
FURTHER EXPLORATION
To learn more about how the back end of the smart clip works, I suggest taking a look at the “Menu-win” library item.
It’s possible to customize the color and the appearance of the menu. To do this, observe the Library and experiment with it (and you might learn something new in the process, too).