Updates
Facebook requires the use of OAUTH2.0 nowadays. Some of the changes required are:
- session is now called authResponse.
- getSession is replaced with getAuthResponse.
- perms is now called scope.
The zip file linked below has these changes (there are changes in .as and .html side and in the first frame of the example .FLA). Please keep this in mind.
This article is a beginner’s How To use the Flash Facebook API (facebook-actionscript-api), in particular in authenticating user and loading the user’s name in Flash applications.
This guide assumes that you are already familiar with the Facebook Graph API and how to create application in Facebook (you need an Application ID to make this example). If not, head over to: http://developers.facebook.com/docs/guides/canvas/
The guide is written for version 1.5 of the facebook-actionscript-api; if you are using 1.0, head over here:
https://www.permadi.com/blog/2010/12/using-facebook-open-graph-api-in-flash-as3/.
If you want to jump to the example, go here: /tutorial/as3-open-graph-example-basic-1.5/index.html?test. To download the code for the example, go to the bottom of this page, under Links section.
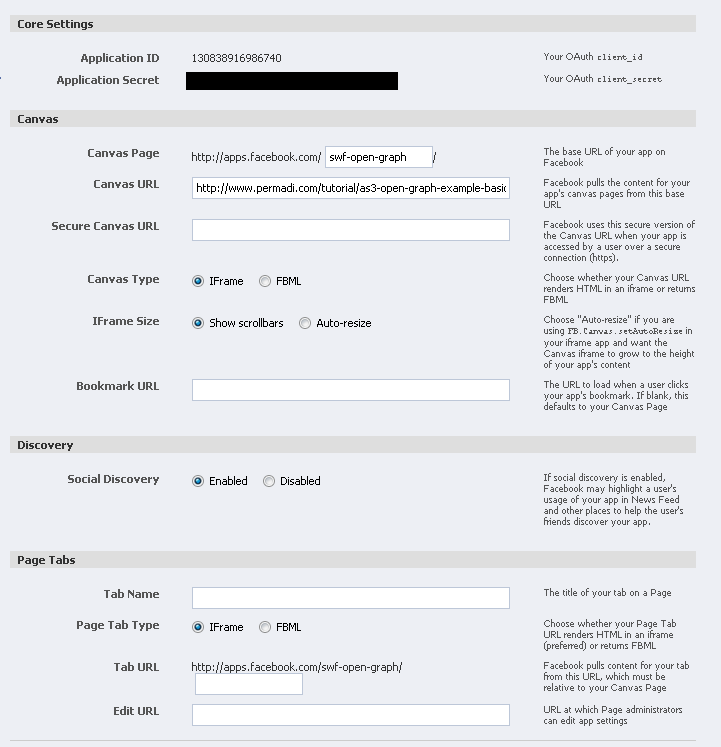
When you set-up your application, set the application as IFrame (not FBML) application. Below is an example of the settings that I use:

Then, follow these steps to set-up your first project in Flash IDE:
1. Download the facebook-actionscript-api from: http://code.google.com/p/facebook-actionscript-api/downloads/list. I have included the version I used for this example in the ZIP file at the end of this article. (Note: This tutorial uses version 1.5.)
2. Start up Flash IDE and create a new project (I am using CS3, but this guide should apply to CS4 and 5 too).
3. Extract the GraphAPI Source_1_5.zip into a folder. For now, I suggest just extracting it into the same folder as your FLA
4. Add the classpath of where you extracted the GraphAPI Source_1_0.zip into the project settings.
Ie: ./GraphAPI Source_1_5/api/ in my folder configuration below: 
5. Extract GraphAPI Examples_1_5.zip somewhere because we will be using the JavaScript and html file from that example later. Note that The GraphAPI Examples_1_5.zip contains examples for Flex Builder 4, and this guide will show you how to use the API in the Flash IDE.
6. From the GraphAPI Examples_150.zip in FacebookAPI_Dec_06_2010_samplesWebIFrameDemo, create a copy of the index.php (you can rename it to index.html if you are not using php).
Now that we’re done with the set up and copying stuff, let’s go into the Flash movie editor:
7. Create a button on the screen, name it “loginButton.”
8. Create a textfield on the screen, name it “nameTextField”

9. Add code to Frame 1 of the FLA (this code is ported from the GraphAPI Examples_150.zip, FacebookAPI_Dec_06_2010_samplesWebIFrameDemo so you will see a lot of similarities):
First, we load up the Facebook API library:
import com.facebook.graph.Facebook;
import com.facebook.graph.data.FacebookSession;
import com.facebook.graph.net.FacebookRequest;
Next, replace the APP_ID with yours, then call Facebook.init().
//Place your application id here
const APP_ID:String = "130838916986740";
//Initilize the Facebook library
Facebook.init(APP_ID, handleLogin);
function handleLogin(response:Object, fail:Object):void
{
	trace("handleLogin");
	if (Facebook.getSession().accessToken)
		changeToLoginState();
}
Facebook.init() will check if the user is already logged in. If user is not already logged in, it will call prompt the user to login (this process is already handled for you). After the user is logged in, it then it checks whether the user has authorized/installed the application and shows the application install/permission dialog (this process is already handled for you).
Facebook.init() passes the callback (in the second parameter) to a function named handleLogin(). So, after those two process, the handleLogin function in the ActionScript side is called — even if the user refused to login.
Now, if user chose not to log-in, we are giving him/her another chance to login by displaying a Login button. The process is slightly different when user clicks the Login button. Now, we’re calling Facebook.login function (which opens as popup). If you want to, you replace this to use in-same-window login as described here: /blog/2011/02/facebook-authenticationlogin-process-in-popup-or-not/, but don’t worry about this now.
Right now, let’s hook up the loginButton to log us into Facebook first.
loginButton.addEventListener(MouseEvent.CLICK, onLoginButtonClicked);

function onLoginButtonClicked(event:MouseEvent):void
{
	trace("onLoginButtonClicked");
	// We check the accessToken to make sure user is logged in
	if (Facebook.getSession() && Facebook.getSession().accessToken==null)
	{
		Facebook.login(handleLogin, {perms:'publish_stream'});
	}
	else
	{
		Facebook.logout(handleLogout);
 	}
}
If you want to request extended permissions, you can pass it as parameters to the login call. For example, below is how to request publish_stream permission:
Facebook.login(handleLogin, {perms:'publish_stream'});
Update
Facebook requires the use of OAUTH2.0 nowadays. Some of the changes required is that perms is now called scope.
Following that, let’s add the changeToLoginState() function, like below. This code is called when user has logged in. In this basic-example, we are just changing the button label to say Logout to allow user to logout.
function changeToLoginState():void
{
	//resultTxt.text += 'Logged in';
	loginButton.label = 'Logout';
	loadMyInfo();
}
In a real application, you can start using other Facebook API once the user is confirmed as logged-in. For this example, to demonstrate that we are indeed logged in, I am just going to call a custom function named loadMyInfo() to get the user name.
And here is the loadMyInfo() function. Following the Graphi API documentation, to get your own info, you can call:
https://graph.facebook.com/me
So that’s what we will do:
function loadMyInfo():void
{
	Facebook.api('/me', onMyInfoLoaded);
}

// Display my name in the text field.
function onMyInfoLoaded(response:Object,fail:Object):void
{
	trace("onMyInfoLoaded "+response.name);
	nameTextField.text=response.name;
}
Above, I called the /me API and then printed the user name in the callback function. Yes, it’s as simple as that. If you are interested about how the api works, continue here, otherwise, skip to Step 8.
It’s nice to know that you can call most of the Graph API’s (http://developers.facebook.com/docs/api) using the Facebook.api() in this manner. Once you get a hang of the process, you should take a look into com.facebook.graph.Facebook.as that comes in the facebook-actionscript-api.
 public static function api(method:String,
                     callback:Function = null,
                     params:* = null,
                     requestMethod:String = 'GET'
This is a very powerful function and you can do a lot by calling the Graph API using just this one function. If you are already familiar with the JavaScript version of the API, it’s almost effortless. Notice also that the callback parameter is a function that follows this format:
function callback(response:Object, fail:Object):void
{
  ...
}
The fail object contains some error informations. If for some reason the api call failed, you should always check the error message to help pinpoint where the problem is, such so:
function myCallback(response:Object, fail:Object):void
{
	if (fail && fail.error)
	{
		trace("error.message="+fail.error.message);
		trace("error.type="+fail.error.type);
	}
}
Another question is: How do I know what is inside the response object? You can always do foreach to print each variables, or you can test most of the API from this page to see the return value in the response object :
http://developers.facebook.com/docs/reference/api/user. For instance, the /me call returned this:
{
   "id": "9999999999999999999999",
   "name": "Permadi Permadi",
   "first_name": "Permadi",
   "last_name": "Permadi",
   "link": "http://www.facebook.com/profile.php?id=9999999999999999999999",
   "birthday": "01/01/1990",
   "gender": "male",
   "timezone": -8,
   "locale": "en_US",
   "verified": true
}
Bookmark the Facebook documentation at:http://developers.facebook.com/docs/reference/api/, you will refer to it a lot.
You can explore more examples here:
- Loading the user picture:
https://www.permadi.com/blog/2010/12/loading-facebook-profile-picture-into-flash-swf-using-open-graph-api/ - Posting to user Photo Album
https://www.permadi.com/blog/2011/02/using-facebook-graph-api-in-flash-as3-to-post-to-photo-album/
10. Now we are almost ready with the Flash movie. Publish the movie as example.swf
11. Create the html page to host the SWF. You can use the one exported by the FLash IDE, but you will need to change a lot of the code, so just use the template below, which is taken from GraphAPI Examples_150.zip in FacebookAPI_Dec_06_2010_samplesWebIFrameDemoindex.php, which you copied in Step 6 above (if you are not using php, just rename it to index.html since there’s nothing that requires PHP in this example).
<html xmlns="http://www.w3.org/1999/xhtml" xmlns:fb="http://www.facebook.com/2008/fbml">
<head>
    <!-- Include support librarys first -->
    <script type="text/javascript" src="http://ajax.googleapis.com/ajax/libs/swfobject/2.2/swfobject.js"></script>
    <script type="text/javascript" src="http://connect.facebook.net/en_US/all.js"></script>
    <script type="text/javascript" src="http://ajax.googleapis.com/ajax/libs/jquery/1.4.2/jquery.min.js"></script>

    <script type="text/javascript">
        var APP_ID = "130838916986740";
        var REDIRECT_URI = "https://www.permadi.com/tutorial/as3-open-graph-example-basic-1.5/index.html";
        var PERMS = "publish_stream"; //comma separated list of extended permissions

        function init()
        {
            FB.init({appId:APP_ID, status: true, cookie: true});
            FB.getLoginStatus(handleLoginStatus);
        }

        function handleLoginStatus(response)
        {
            if (response.authResponse && response.status=="connected")
            {
                //Show the SWF
                $('#ConnectDemo').append('<h1>You need at least Flash Player 9.0 to view this page.</h1>');
                swfobject.embedSWF("Facebook-Open-Graph-Example-1.5.swf",
                    "ConnectDemo", "550", "250", "9.0", null, null, null, {name:"ConnectDemo"});

            }
            else
            {
                var params = window.location.toString().slice(window.location.toString().indexOf('?'));
                top.location = 'https://graph.facebook.com/oauth/authorize?client_id='
                    +APP_ID
                    +'&scope='+PERMS
                    +'&redirect_uri=' + REDIRECT_URI
                    + params;
            }
        }
        $(init);
    </script>
</head>
<body>
    <div id="fb-root"></div>
    <div id="ConnectDemo"></div>
</body>
</html>
Notes
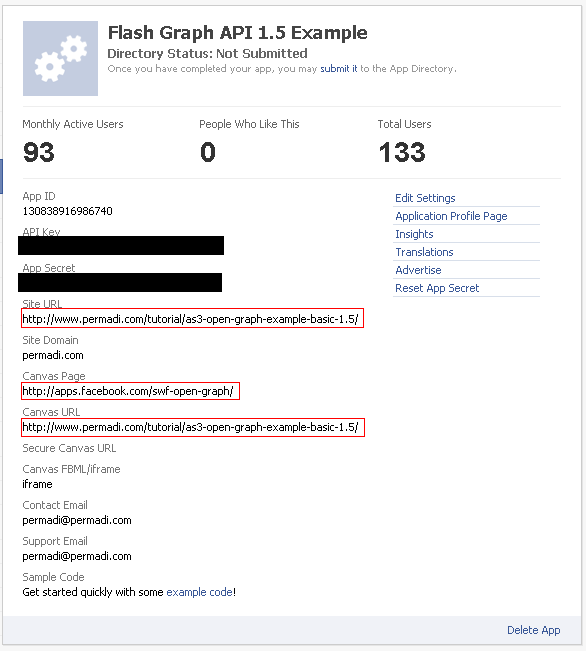
- The REDIRECT_URI tells Facebook where to go back to after the user logs into Facebook from your application. You need to set this to your own url. See the picture below. The REDIRECT_URI should be either the Canvas Page, the Canvas URL, or to some url within your Site URL.

For staring out, I recommend just setting the Canvas URL to be the exact same as the REDIRECT_URI, and make sure the Canvas URL is within the Site URL (ie: if your Site URL is http://www.example.com/example1/, you should make sure the Canvas URL is nested within /example1/ folder. - Change APP_ID to yours.
- Set PERMS to be the same as the one you use in Facebook.init in the Action Script side (Step 7).
- Change embed.swf with the name of your SWF file if necessary.
- Change the swf dimensions if necessary.
- Alert: The params variable within the Javascript handleLoginStatus() assumes that there’s a query-string in your URL. If you are using static html or have no use for the query-string, then you should just remove all references to params (do NOT remove the whole line, just the + params part).Eq:
top.location = 'https://graph.facebook.com/oauth/authorize?client_id='+APP_ID+
  '&scope='+PERMS+
  '&redirect_uri=' + REDIRECT_URI;
Alternatively, you can always append a dummy query string at the end of your url.
So if my page is https://www.permadi.com/tutorial/as3-open-graph-example-basic-1.5/, I need to call it with
https://www.permadi.com/tutorial/as3-open-graph-example-basic-1.5/?test, where ?test is the dummy query-string. Of course you can always alter the Javascript to handle this more elegantly. Failure to properly pass the redirect_uriwill cause the app not to load after the login process. - To test the movie, you need to run the swf from the html. You cannot use the test movie feature within Flash IDE because the movie needs to communicate with JavaScript. So you should publish the movie and test by opening the html.
For starting out, I highly recommend to upload all the published files to a server for testing the redirect() (and make sure your Facebook app Site URL and Canvas URL are set to that website folder). If you are testing locally and receive permission error, you can add your local machine to the Flash Settings to allow communication. If you got a blank page after login, make sure your REDIRECT_URI is set correctly and also check the note about params above.
Updates
Facebook requires the use of OAUTH2.0 nowadays. Some of the changes required are:
- session is now called authResponse.
- getSession is replaced with getAuthResponse.
- perms is now called scope.
The zip file linked below has these changes (there are changes in .as and .html side and in the first frame of the example .FLA).
Links
- Example page living on my website: /tutorial/as3-open-graph-example-basic-1.5/index.html?test
- Example page (exact same code) living on Facebook: http://apps.facebook.com/swf-open-graph/index.html?test (If you want to redirect to go to the IFramed Facebook version, you should use PHP and add a query-string to indicate where the user comes from, then set the RETURN_URL accordingly).
- Source files of the above example: /tutorial/as3-open-graph-example-basic-1.5/as3-open-graph-example-basic-1.5.zip (note: the FacebookSession.as and FacebookJSBridge.as in the attached Facebook Graph API has been modified to support OAUTH2.0 — OAUTH2.0 is required since Dec 2011).
- Real application example: Easter Your Facebook Friend
Credit to the facebook-actionscript-api to http://code.google.com/p/facebook-actionscript-api/ which comes under MIT license.
