In this example, we will use Cocos2d’s scripted animation to create a bouncing ball animation. This example assumes familiarity with setting up a simple cocos2d project. Please review the previous guides if necessary. The example below is based on the cocos2d example named Click And Move which came with the cocos2d package.
Note: this guide is written for cocos2d version 0.71. If you are using 0.73 or later and are having issues, check the following post:
https://permadi.com/blog/2010/03/cocos2d-compiling-hint/
https://permadi.com/blog/2010/03/cocos2d-for-iphone-migrating-0-71-to-0-73/
Step1
File->New Project. Select Window-Based Application. Name the project BouncingCocos.
Step2
Get an image to be used as the bouncing-ball and add it into Resources group. The one I am using below, downloaded from: http://noobr.net/2009/02/15-smiley-icon-sets-express-yourself/
Step3
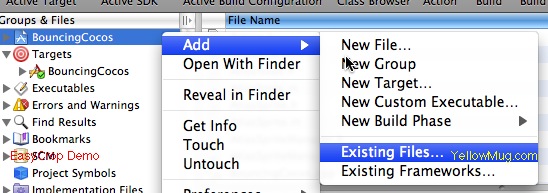
Include Cocos2d files into the project (alternatively, you can link to the library if you have built the library as described here). To include the files, Control-Click the project name on the Group & Files node, then include files from the Cocos2d distribution that you have.
Navigate into your Cocos2d distribution (wherever you extracted the Cocos2d sources into, mine is at Macintosh HD::cocos2d-iphone-0.7.1 folder.
Add these sub-folders into BouncingCocos project:
cocos2d and external/Chipmunk/src
Step4
Add the code into BouncingCocosAppDelegate.m.
#import "BouncingCocosAppDelegate.h"
#import "Cocos2d.h"
@implementation BouncingCocosAppDelegate

@synthesize window;
- (void) applicationDidFinishLaunching:(UIApplication*)application
{
	// Init the window
	window = [[UIWindow alloc] initWithFrame:[[UIScreen mainScreen] bounds]];

	// Set to the landscape mode
	[[Director sharedDirector] setLandscape: YES];

	// Attach the OpenGL view to a window
	[[Director sharedDirector] attachInView:window];

	// Create a sprite and load our image into it (substitute the image name with yours)
	Sprite *ballSprite = [Sprite spriteWithFile: @"ico2.png"];
	// I am scaling my image because it's too large
	ballSprite.scale=0.1;
	[ballSprite setPosition: cpv(0, 0)];

	// The scripted animation call is here.
	// It's using JumpTo animation.  See JumpTo docs for explanation of the parameters
	[ballSprite runAction:
		[JumpTo actionWithDuration:4
					position:cpv(window.bounds.size.height, 0)
					height:100
					jumps:4]
		];

	ColorLayer* layer = [ColorLayer layerWithColor: 0xffff00ff];
	[layer addChild: ballSprite z:0 tag:1];

	// Create a Scene object
	Scene *scene = [Scene node];
	// Add the Layer into Scene
	[scene addChild: layer z:-1];
	// Make the Scene active
	[[Director sharedDirector] runWithScene: scene];

	[window makeKeyAndVisible];

}

- (void)dealloc {
    [window release];
    [super dealloc];
}

@end
The code uses runAction on a Sprite object.
Step5
Run and Build.
You can download the source here (includes Cocos2d library) here.
Note: this guide is written for cocos2d version 0.71. If you are using 0.73 or later and are having issues, check the following post:
https://permadi.com/blog/2010/03/cocos2d-compiling-hint/
https://permadi.com/blog/2010/03/cocos2d-for-iphone-migrating-0-71-to-0-73/
Also, here are some memory optimization tips: https://permadi.com/blog/2010/03/cocos2d-color-depth-and-memory-optimizations/


