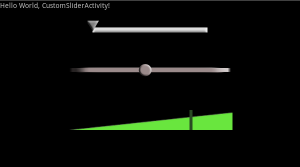
I was having some issue customizing the look and behavior of the default SeekBar so I tried writing a custom one. Here’s the result, hope it’s useful and interesting:
My approach is to create a Layout consisting of two ImageViews: a “slider bar” and a “slider thumb” images. Then, in the onDraw function, I draw those ImageViews manually.
This is a snippet of the code containing the most complex portion, where the custom drawing is done:
public class CustomSliderView extends FrameLayout implements OnTouchListener
{
	@Override
	protected void onDraw (Canvas canvas)
	{
		// Load the resources if not already loaded
		if (mThumbImageView==null)
		{
			mThumbImageView=(ImageView)this.getChildAt(1);
			this.removeView(mThumbImageView);

			if (mThumbResourceId>0)
			{
				mThumbBitmap=BitmapFactory.decodeResource(getContext().getResources(), mThumbResourceId);
				mThumbImageView.setImageBitmap(mThumbBitmap);
			}

			// USe the drawing cache so that we don't have to scale manually.
			mThumbImageView.setDrawingCacheEnabled(true);
			mThumbBitmap = mThumbImageView.getDrawingCache(true);
		}
		if (mSliderBarImageView==null)
		{
			mSliderBarImageView=(ImageView)this.getChildAt(0);
			this.removeView(mSliderBarImageView);

			// If user has specified a different skin, load it
			if (mSliderBarResourceId>0)
			{
				mSliderBarBitmap=BitmapFactory.decodeResource(getContext().getResources(), mSliderBarResourceId);
				mSliderBarImageView.setImageBitmap(mSliderBarBitmap);
			}

			// USe the drawing cache so that we don't have to scale manually.
			mSliderBarImageView.setDrawingCacheEnabled(true);
	        	mSliderBarBitmap = mSliderBarImageView.getDrawingCache(true);

	        	mSliderLeftPosition=mSliderBarImageView.getLeft();
	        	mSliderRightPosition=mSliderBarImageView.getLeft()+mSliderBarBitmap.getWidth();
		}

		// Adjust thumb position (this handles the case where setScaledValue() was called)
		if (mTargetValue>0)
        	{
	        	float fillWidth=mSliderBarImageView.getMeasuredWidth();
	    		float range=(mMaxValue-mMinValue);
	    		mTouchXPosition=((mTargetValue-mMinValue)/range)*fillWidth;
	    		mTargetValue=0;
        	}

        	// Don't allow going out of bounds
        	if (mTouchXPosition<mSliderLeftPosition)
        		mTouchXPosition=mSliderLeftPosition;
        	else if (mTouchXPosition>mSliderRightPosition)
        		mTouchXPosition=mSliderRightPosition;

        	if (mSliderBarBitmap!=null)
        		canvas.drawBitmap(mSliderBarBitmap, mSliderLeftPosition, mSliderBarImageView.getTop(), null);
        	if (mThumbBitmap!=null)
        		canvas.drawBitmap(mThumbBitmap, mTouchXPosition-mThumbBitmap.getWidth()/2, mThumbImageView.getTop(), null);
	}
}
There’s a couple of tricky places and the approach that I did might not be the only or the best way. One is that I want to be able to customize the bitmap (reskin) programatically. This is where I pulled the resource (bitmap) and replaced it with the specified bitmap:
		// Load the resources if not already loaded
		if (mThumbImageView==null)
		{
			mThumbImageView=(ImageView)this.getChildAt(1);
			this.removeView(mThumbImageView);

			if (mThumbResourceId>0)
			{
				mThumbBitmap=BitmapFactory.decodeResource(getContext().getResources(), mThumbResourceId);
				mThumbImageView.setImageBitmap(mThumbBitmap);
			}

			// USe the drawing cache so that we don't have to scale manually.
			mThumbImageView.setDrawingCacheEnabled(true);
			mThumbBitmap = mThumbImageView.getDrawingCache(true);
		}
same case with the “bar”.
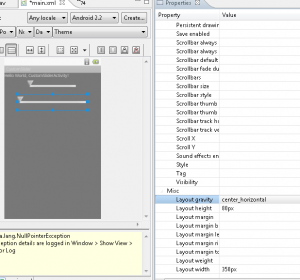
The view should also be presentable within Eclipse GUI layout editor, and that’s where the if (mThumbResourceId>0) branch comes in. Also I didn’t want to use any reference to R.id.xxx in the code since that requires dependency with the resource, so I used (ImageView)this.getChildAt(0);. You might know a better way than that, feel free to experiment.
Attached at the end of this article is an example project. To use just the slider, you need to include the CustomSliderView.java and the two default drawable for the thumb and the slider-bar. It can then be added it into the layout XML like this:
<com.permadi.ui.CustomSliderView
	android:id="@+id/slider1"
	android:layout_width="250px"
	android:layout_height="80px"
	android:layout_gravity="center_horizontal"
	android:padding="10px" >

	<ImageView android:id="@+id/sliderBar"
		android:layout_width="fill_parent"
		android:layout_gravity="center_vertical|fill_horizontal"
		android:layout_height="10px" android:scaleType="fitXY"
		android:src="@drawable/slider_bar">
	</ImageView>
	<ImageView android:id="@+id/thumbBar"
		android:src="@drawable/slider_thumb"
		android:layout_width="wrap_content"
		android:layout_height="wrap_content"
		android:layout_gravity="center_vertical">
	</ImageView>
</com.permadi.ui.CustomSliderView>
The android:src=”@drawable/slider_bar” specifies which drawable object to use as the slider-bar; the android:src=”@drawable/slider_thumb” specifies which drawable to use as the thumb.
The code to control it would be something like this:
        CustomSliderView slider1=(CustomSliderView)this.findViewById(R.id.slider1);
        slider1.setDelegateOnTouchListener(this);

        CustomSliderView slider2=(CustomSliderView)this.findViewById(R.id.slider2);
        slider2.setDelegateOnTouchListener(this);
        slider2.setResourceIds( R.drawable.slider_other_thumb, R.drawable.slider_bar_other_skin);
        slider2.setRange(1, 500);
        slider2.setScaledValue(250);
Bonus: The bar can be skinned programatically by calling setResourceIds(int thumbResourceId, int sliderBarResourceId) — this is the slider2 in the example above. You’d want to use 9 patch images for best result although you don’t have to.
Here’s an example of the drawables used to create the first slider shown above:
![]()
Download Class and example. (Eclipse, Android 2.2).

