Continuing from: https://permadi.com/blog/2009/05/dashcode-invader-using-dashcode-to-create-a-game/
Base class for the objects in the game. Let’s consider what objects will be in our game. I can think of three-types:
- Player ship
- Enemy ship
- Bullet
These objects have in commons these charateristics:
- They all have positions.
- They all can move (needs speed variable).
Let’s call the base class GameObject from where we will derive Bullet from.
The GameObjectFromObjectId is a helper class so that we don’t have to keep caling document.getElementById.
Create GameObject.js and enter the code below:
GameObject.prototype.setXYSpeed=function(xSpeed, ySpeed)
{
  this.xSpeed=parseInt(xSpeed);
  this.ySpeed=parseInt(ySpeed);
}

function GameObject(domObject)
{
  this.domObject=domObject;
  setXYSpeed(0,0);
}

GameObjectFromObjectId.prototype=new GameObject();

function GameObjectFromObjectId(objectId)
{
  var domObject=document.getElementById(objectId);
  GameObject.call(this, domObject);
}

GameObject.prototype.getXSpeed=function()
{
  return this.xSpeed;
}

GameObject.prototype.getYSpeed=function()
{
  return this.ySpeed;
}
Edit main.js to assign the playerShip as a GameObject. Let’s do this when the game start, inside a function named startGame():
function startGame()
{
    playerShip=new GameObjectFromObjectId("playerShip");
    playerShip.setXYSpeed(10,20);
    alert("Player speed is ("+playerShip.getXSpeed()+", "+playerShip.getYSpeed()+")");
}
Let’s make Dashcode call this function when the page loads, by adding editing the onload handler:

function load()
{
    dashcode.setupParts();
    startGame();
}
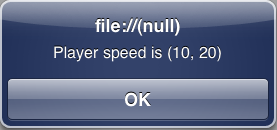
Run it and it should show the alert like below, showing the values we assigned as the speed:
Bullets
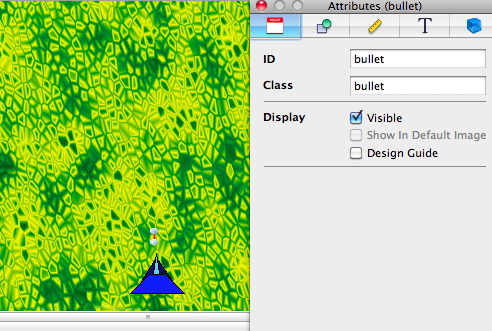
Let’s import an image to be used as bullet. The one I use is a simple rectangle (it’s the red dash above the player ship shown below).
Name the id bullet.
The main.css should look like this:
/*
 This file was generated by Dashcode.
 You may edit this file to customize your widget or web page
 according to the license.txt file included in the project.
 */

body {
    margin: 0px;
    min-height: 356px;
    font-family: Helvetica;
}

.background {
    position: absolute;
    width: 320px;
    height: 358px;
    left: 0px;
    top: 0px;
    background-image: url(Images/texture.png);
}

.playerShip {
    width: 64px;
    height: 64px;
    position: absolute;
    left: 131px;
    background-image: url(Images/player.png);
    top: 282px;
}

.bullet {
    width: 3px;
    height: 12px;
    position: absolute;
    top: 281px;
    left: 131px;
    background-image: url(Images/bullet.jpg);
}

#content {
    position: relative;
    -webkit-margin-top-collapse: separate;
    -webkit-margin-bottom-collapse: separate;
    margin-top: 0px;
    margin-left: 0px;
    margin-right: 0px;
    width: auto;
    min-height: 360px;
    height: auto;
}
Moving The Bullet
To add movement, we need to be able to move the position of the object and for that, we can use style-sheet positioning. Edit the GameObject.js, and add the following:
GameObject.prototype.move=function()
{
    var newX=this.getX()+this.xSpeed;
    this.setX(newX);

    var newY=this.getY()+this.ySpeed;
    this.setY(newY);
}
The function seems simple but there are some complications because sometimes HTML elements are using different units (such as px and some doesn’t even have units. To handle that, we create a helper function named getStyleNumericValue that takes a style-sheet property name (such as left, offsetWidth as a parameter. We are also going to use px as the unit all the time to avoid compications. Important: in our game, we are making an assumption that all units are in px, therefore when you change the style-sheet, you should make sure to use px and not any other unit.
GameObject.prototype.unit.length="px;

GameObject.prototype.getX=function()
{
  return this.getStyleNumericValue("offsetLeft");
}

GameObject.prototype.getY=function()
{
  return this.getStyleNumericValue("offsetTop");
}

GameObject.prototype.getStyleNumericValue=function(variableName)
{
  var value=this.domObject.style[variableName];
  //alert(variableName+"="+this.unit.length);
  if (!value)
    value=this.domObject[variableName];
  //alert(variableName+"="+value);

  if (value==undefined)
  {
    value=0;
  }
  // Check whether the value is a number, and if it is not,
  // then we assume that the value is something like: 20px so
  // we need to remove  the <strong>px</strong> to get just the numeric value.
  else if (isNaN(value))
    value=value.substr(0, value.length-this.unit.length);
  return parseInt(value);
}

GameObject.prototype.getWidth=function()
{
  var width=this.getStyleNumericValue("offsetWidth");
  return width;
}

GameObject.prototype.getHeight=function()
{
  var height=this.getStyleNumericValue("offsetHeight");
  return height;
}
We also added getWidth and getHeight functions, which will be useful for collision-detection and positioning.
Animation Timer
To do animation, we need to be able to change the state of our game objects periodically to give the appearance of fluidity. This part of the code is usually referred as the game loop. For our simple game, it looks like below:
function gameLoop()
{
    for (var i=0; i<gameObjectsArray.length; i++)
    {
        var gameObject=gameObjectsArray[i];
        gameObject.move();
    }
}
This function needs to be called periodically, for example to move the y position some amount of pixels per second. We can use a timer callback for this purpose with setInterval function (set to call gameLoop every 50 miliseconds in our example below).
function startGame()
{
    playerShip=new GameObjectFromObjectId("playerShip");
    bullet=new GameObjectFromObjectId("bullet");
    addGameObject(bullet);
    timer = setInterval('gameLoop()',50);
}

function gameLoop()
{
    for (var i=0; i<gameObjectsArray.length; i++)
    {
        var gameObject=gameObjectsArray[i];
        gameObject.move();
    }
}

var gameObjectsArray=new Array();

function addGameObject(gameObject)
{
    gameObjectsArray.push(gameObject);
}

function onTouchStartHandler(event)
{
    event.preventDefault();

    bullet.setXYSpeed(0,-12);
    bullet.setY(playerShip.getY());
    bullet.setX(playerShip.getX()+playerShip.getWidth()/2);
}

function onMouseClickHandler(event)
{
    bullet.setXYSpeed(0,-12);
    bullet.setY(playerShip.getY());
    bullet.setX(playerShip.getX()+playerShip.getWidth()/2);
}
Also, notice the gameObjectsArray variable. This is to keep track of all the GameObjects that we have and to iterate every one of them (currently, there is one bullet, but later on, there can be many bullet and other game objects, such as enemies stored in this array).
In onTouchStartHandler we make the bullet moves upward from the current player position (so this means when you click, the bullet will be re-emitted because we currently only have one bullet). We also do the same thing in onMouseClickHandler just so that we can use the same code in a regular browser.
The line below is to center the bullet in the player’s center X position (since getX() returns the left position, not the center position).
bullet.setX(playerShip.getX()+playerShip.getWidth()/2);
At this point, the index.html should look like below:
    <div id="content" onmousemove="onMouseMoveHandler(event)"  onclick="onMouseClickHandler(event)">
        <div id="background" class="background"
            ontouchmove="onTouchMoveHandler(event)"
            ontouchstart="onTouchStartHandler(event)"
            onmousemove="onMouseMoveHandler(event)">
            <div id="playerShip" class="playerShip"
               ontouchmove="onTouchMoveHandler(event)"
               ontouchstart="onTouchStartHandler(event)"
               onmousemove="onMouseMoveHandler(event)" >
            </div>
            <div id="bullet" class="bullet" ontouchcancel="aa(event)">
            </div>
       </div>
   </div>
Run and try the application, the result should be something like below:
Stay tuned for the next part of the post.


