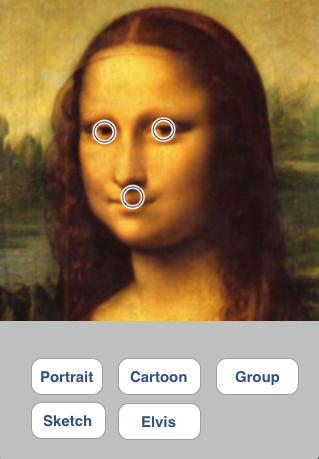
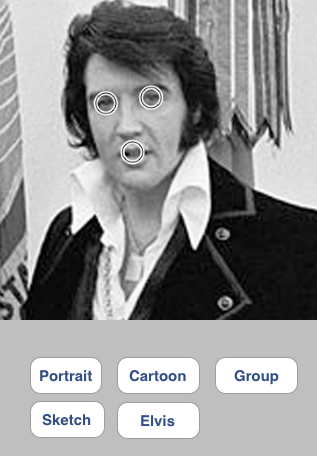
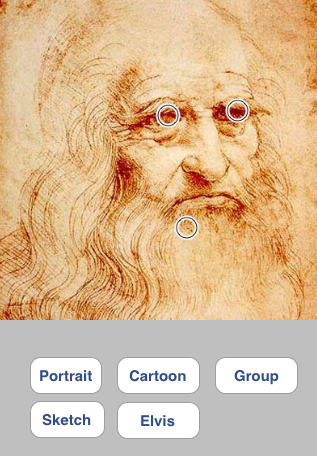
iOS 5 introduces something interesting, which is some sort of Facial Detection capability. Right now it only detects the position of eyes and mouth but expect it to have more in future iOS versions.
First, the requirements:
- Compile with iOS SDK version 5 or later
- You need to include CoreImage.framework into your project.
- Your build target must be iOS 5 or greater (while you target something less than 5, your app will likely crash when executing CIDetector calls.
The coding is straightforward.
Construct a CIDetector object using:
    +(CIDetector *)detectorOfType:(NSString *)type
                                       context:(CIContext *)context
                                       options:(NSDictionary *)options
The Apple documentation suggest reusing the CIDetector because it takes up significant resources.
There’s only one possible value for type at this point: CIDetectorTypeFace.
The options parameter is something like:
NSDictionary options=
  [NSDictionary dictionaryWithObject:CIDetectorAccuracyHigh
                                              forKey:CIDetectorAccuracy];
where the value can either be CIDetectorAccuracyHigh or CIDetectorAccuracyLow. CIDetectorAccuracyHigh is obviously slower than CIDetectorAccuracyLow but CIDetectorAccuracyLow might be preferred in real-time streams.
Call
- (NSArray *)featuresInImage:(CIImage *)image
The CIImage (CoreImage) can be obtained from (among other methods) an UIImage, like this for example:
CIImage* ciImage = [CIImage imageWithCGImage:uiImage.CGImage];
The result of calling featuresInImage is an array of CIFaceFeature objects. It’s an array instead of a single object because the detector will detect more than one face if there are more than just one face in the image.
http://developer.apple.com/library/mac/#documentation/CoreImage/Reference/CIFaceFeature/Reference/Reference.html.
The has these properties:
- hasMouthPosition
- hasLeftEyePosition
- hasRightEyePosition
- mouthPosition
- leftEyePosition
- rightEyePosition
A simple example looks like below, where uiImage is an UIImage object.
	NSDictionary* options=[NSDictionary dictionaryWithObject:CIDetectorAccuracyHigh forKey:CIDetectorAccuracy];
	CIDetector* detector = [CIDetector detectorOfType:CIDetectorTypeFace context:nil options:options];

	CIImage* ciImage = [CIImage imageWithCGImage:uiImage.CGImage];
	NSArray* arrayOffacialFeatures = [detector featuresInImage:ciImage];

	for (CIFaceFeature* facialFeature in arrayOffacialFeatures)
	{
		if (facialFeature.hasMouthPosition)
		{
			[self drawMarker:facialFeature.mouthPosition];
		}

		if (facialFeature.hasLeftEyePosition)
		{
			[self drawMarker:facialFeature.leftEyePosition];
		}

		if (facialFeature.hasRightEyePosition)
		{
			[self drawMarker:facialFeature.rightEyePosition];
		}
	}
The loop in that code draws a circle marker around the detected points. Here’s the output example:


You can see the detection works pretty well in the Mona Lisa and cartoon image. The Da Vinci one gets the mouth position slightly wrong, but considering this is not even a portrait but more like a sketch, I thought it’s a good result nevertheless. The group image detection (last picture) demonstrates that it detects all three faces (even the titled cartoon image). And oddly enough Da Vinci’s mouth is detected more accurately there, maybe less beard make it less confusing.
Image acknowledgements (the portraits are either under Public Domain or CCL, see site for terms):
- Mona Lisa image: http://commons.wikimedia.org/wiki/File:Mona_Lisa_headcrop.jpg
- Leonardo Da Vinci image: http://en.wikipedia.org/wiki/File:Leonardo_self.jpg
- Elvis image: http://en.wikipedia.org/wiki/File:Elvis-nixon.jpg
- Cartoon: I drew it
I will post the example XCode project used above here, soon. You can also download my free app: FaceBlimp, which utilizes facial detection.